

Introducing Bulk Substrate to Colonised Grain
How Do You Introduce Substrate to Colonised Grain? Quick Answer
Introducing substrate to colonised grain, often called the spawn-to-bulk stage, is one of the most critical steps in home mushroom cultivation. Wait until your grain is fully white and consolidated, give it an extra week to strengthen, then mix it into pasteurised or sterilised bulk substrate at a ratio of 2:1 or 3:1 (bulk substrate to spawn). Ensure your substrate is at field capacity before mixing, work in a clean environment, and incubate at 21–24°C until the block is fully colonised. If you're growing gourmet species like oyster, lion's mane, or shiitake, matching your substrate to your species makes a significant difference to yield.
How to Tell When Your Grain Is Ready and How to Transfer It to Bulk
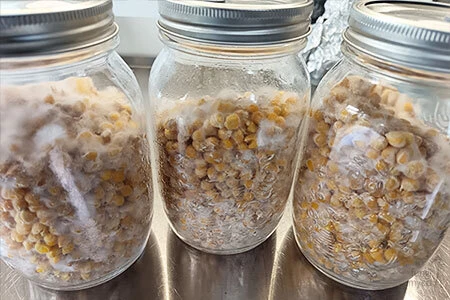
Patience is the single most underrated skill in mushroom cultivation. Rushing the grain-to-bulk transfer is the number one mistake beginner growers make, and it costs them entire grows.
Fully colonised grain has a distinctive appearance. The entire mass consolidates into a solid white block, with individual grains no longer visible through the mycelium. It feels firm when you press the outside of the bag or jar. There are no dark, moist, or bare patches remaining. You may notice slight yellowing in places: this is metabolite secretion from the mycelium, and it is completely normal. It is not contamination.
When you think your grain is fully colonised, wait an extra week before mixing to bulk. That extra time lets the mycelium strengthen, thicken, and lay down denser hyphal networks. Stronger grain colonises bulk substrate faster and, more importantly, competes far more aggressively against airborne contaminants during the mixing stage. It costs you seven days. It buys you a significantly better chance of a clean, successful grow.
Introducing substrate to colonised grain before it reaches this stage carries a serious risk. Partially colonised grain still has exposed nutrients that bacteria and competing moulds can exploit. The moment you open your jar or bag and mix it into bulk substrate, you introduce oxygen and potential contaminants. Mycelium that hasn't fully established itself yet simply cannot compete.
Cooler ambient British home temperatures, particularly in autumn and winter, slow colonisation considerably. Grain that colonises in 10 days in a heated grow room might take 16 to 20 days in a draughty British spare bedroom. A propagation heating mat set to 22°C underneath your jars or bags makes a measurable difference. On grain type: rye berry is the practical default, plus it's widely available.
Once your grain is fully colonised, and you've given it that extra week to strengthen, the transfer process requires care. Break up your grain from outside the bag or jar first, applying gentle pressure to separate it into individual pieces without shearing the hyphal network. Work in a still-air environment. A large clear storage box with two arm holes cut into the sides dramatically reduces airborne contamination risk during mixing, and is a practical, low-cost solution for UK home growers at any level. For more learn how to make your first Still Air Box.
The standard ratio when introducing substrate to colonised grain is 2:1 or 3:1 (bulk substrate to spawn), meaning 2 or 3 parts bulk substrate for every 1 part colonised grain. A 2:1 mix, which works out to roughly a third of the total volume being grain, accelerates colonisation and gives mycelium a stronger competitive edge against contaminants. A 3:1 mix stretches your spawn further but colonises more slowly. For UK home growers mixing without a flow hood, erring toward 2:1 is genuinely advisable. Mix thoroughly until grain pieces are evenly distributed throughout the bulk. Uneven mixing creates islands of unprotected substrate, and those patches are where contamination establishes first.
Choosing Your Bulk Substrate and Getting Moisture Right Before Mixing
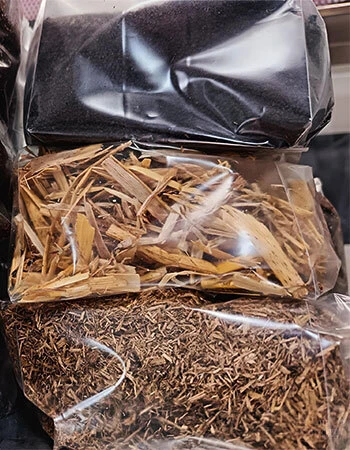
Not all substrates are created equal. The nutrition and texture of your bulk substrate directly shapes how fast mycelium colonises, how dense your block becomes, and ultimately how generous your fruiting is. And before any of that matters, your substrate moisture must be correct. Both concerns belong together.
When introducing substrate to colonised grain, species matching matters enormously. Here's how to pair the three most popular UK gourmet species with their ideal bulk substrates:
Pasteurisation (70–82°C for one to two hours) is sufficient for low-nutrient substrates like straw and CVG. Sterilised substrates, those supplemented with bran, soy hulls, or other nitrogen-rich additions, need full sterilisation at 121°C to eliminate heat-resistant bacterial endospores. Numerous sources outline preparation standards that informed commercial growers follow, and they apply equally well at home scale [1].
Moisture is the second critical variable before you mix. Field capacity is the point at which substrate holds maximum water without free water pooling. Too much water drives out oxygen and opens the door to bacterial contamination; too little, and colonisation stalls. The test is simple: squeeze a firm handful as hard as you can. If water streams freely, it's too wet. If nothing drips, add water incrementally and retest. Three to five drops falling under maximum pressure is the target.
For UK growers in hard water areas (much of southern England qualifies), mineral-heavy tap water can subtly alter substrate chemistry over time. Filtered or boiled-and-cooled water is a straightforward fix if you notice unexplained slow colonisation and your other variables appear correct. If you'd rather skip substrate preparation entirely, our Metropolis Base is a pre-sterilised 50/50 CVG mix, prepared in the Fungi Myco lab, hydrated to field capacity and ready to mix straight from the bag (also included in our Canopio 2 Part Grow Kit along with step-by-step instructions). It's a clean, consistent shortcut for growers who want to focus on the spawn-to-bulk stage without the fuss of building a substrate from scratch.
Incubation Conditions After Mixing: Temperature, Airflow, and What to Expect
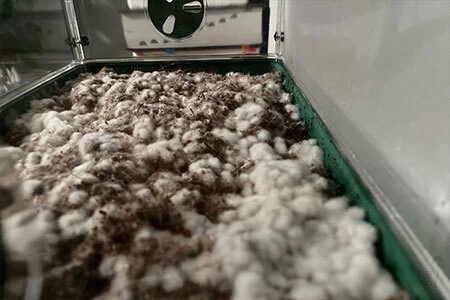
Once your grain and substrate are mixed, the grow essentially runs itself, if your conditions are right.
Most gourmet species colonise bulk substrate fully within 10 to 21 days after introducing substrate to colonised grain. The wide range reflects real variables: species, spawn ratio, substrate density, and ambient temperature all play a role. Oyster mushrooms are the fastest, often colonising in 10 to 14 days at optimal temperatures. Lion's mane tends toward the middle of that range, while shiitake sits at the slower end and may need longer than 21 days before the block begins its characteristic browning phase.
Temperature is the most controllable variable [2]. Most gourmet species colonise well between 20°C and 25°C, with 21°C to 24°C the reliable sweet spot for a mixed home setup. In the UK, this is harder to maintain than many cultivation guides acknowledge. British homes, particularly outside summer, often sit at 17°C to 19°C. That's enough to support colonisation, but it slows things noticeably. A propagation heating mat beneath your container, combined with a thermometer, is the cleanest solution for UK growers. Avoid placing containers directly on cold floors or near exterior walls.
Airflow during incubation should be minimal. Mycelium does not need fresh air exchange at this stage: it generates its own CO₂-rich microenvironment that actually suppresses competing organisms. Direct airflow desiccates the surface and creates dry patches that colonise unevenly. Keep lids on loosely or use polyfill-stuffed holes for passive gas exchange only.
Day by day, you should see fluffy white growth extending outward from each grain contact point. By day five or six, these patches begin to merge. By day ten to fourteen in good conditions, the entire block should appear uniformly white. Yellow patches of metabolite secretion are normal. Any green, black, pink, or foul-smelling areas are not; act on those immediately.
Once the block is fully consolidated and dense white throughout, it's ready for fruiting conditions. That transition, dropping CO₂, increasing humidity, introducing light, is where the real reward begins. Container choice matters at this stage too: monotubs and polypropylene grow bags are both widely used by UK home growers and suit most gourmet species well, while tray methods work particularly well for oyster mushrooms.
Spotting Contamination at the Spawn-to-Bulk Stage and What to Do About It

Contamination at the spawn-to-bulk stage is not a failure of character. It's feedback. It tells you exactly where your process needs tightening.
When introducing substrate to colonised grain, this stage carries the highest contamination risk of the entire grow. You're opening colonised material, mixing it with bulk substrate, and exposing everything to the environment, even briefly. Knowing what you're looking at is the difference between catching a problem early and losing an entire batch.
Use this decision framework when assessing your bulk after mixing:
If you're not sure what you're looking at, don't guess. Our free AI-powered Contam Buster was built for exactly this moment. Upload a photo of your grain, agar, or bulk block and the tool returns a most-probable diagnosis, a confidence rating, visual indicators, probable causes, recommended action, and a prevention strategy for next time. It's a second pair of eyes when you need one most, and it's free to use.
The most common contamination entry points at this stage are inadequate substrate pasteurisation, poor aseptic technique during mixing, and, critically, using grain that wasn't fully colonised [3]. All three are preventable. For growers ready to work across the full cycle, our Canopio 2 Part Grow Kit pairs three pre-poured agar plates with pre-sterilised grain, CVG bulk substrate, and a fruiting bag, along with step-by-step online instructions — taking out the guesswork. Remember to sanitise every surface and tool before you begin. Work quickly once your substrate and grain are open. Choose a still-air environment. And never rush the grain.
FAQs
Fully colonised grain appears as a solid, dense white mass with no visible uncolonised grains remaining. It should feel consolidated and may show slight yellowing from mycelial metabolites. Once it looks fully colonised, wait an additional week before mixing to bulk; this extra time strengthens the mycelium and dramatically improves its ability to outcompete contaminants during transfer.
A standard ratio is 2:1 or 3:1 bulk substrate to spawn: that is, 2 or 3 parts bulk substrate for every 1 part colonised grain. A 2:1 mix speeds up colonisation and reduces contamination risk because the mycelium has more contact points to spread from. For UK beginners working without a flow hood, erring toward 2:1 is advisable to give mycelium a competitive advantage over potential contaminants during mixing.
Field capacity describes the point at which substrate holds maximum moisture without excess free water. To test it, take a handful of prepared substrate and squeeze firmly, and only a few drops should fall. If water streams out freely, the substrate is too wet. If nothing drips at all, it likely needs more hydration before mixing.
The best substrate depends on your mushroom species. Oyster mushrooms thrive on straw, hardwood sawdust, or CVG mix. Lion's mane performs best on supplemented hardwood sawdust. Shiitake suits sterilised masters mix or hardwood blocks. For UK growers who want to skip substrate preparation, our Metropolis Base is a pre-sterilised 50/50 CVG mix hydrated to field capacity and ready to use straight from the bag.
Most gourmet species fully colonise bulk substrate within 10 to 21 days after mixing, depending on species, spawn ratio, and temperature. UK growers should note that cooler ambient home temperatures can extend this timeline. Using a heating mat to maintain 21–24°C and a 2:1 bulk-to-spawn ratio will help achieve faster, more consistent colonisation results.
- UK Government, Mushroom Substrate Manufacturing Process Guidance Note 630. Available at: https://www.gov.uk/government/publications/mushroom-substrate-manufacturing-process-guidance-note-630 (Accessed 13 August 2026).
- AHDB Horticulture — Mushroom Research Resources. Available at: https://horticulture.ahdb.org.uk/knowledge-library/mushroom-resources (Accessed 13 August 2026).
- Shroomery, Is full colonization before spawning absolutely necessary with grains?. Available at: https://www.shroomery.org/forums/showflat.php/Number/7687154 (Accessed 13 August 2026).