
First Grow: Beginner's Guide to Growing Gourmet Mushrooms at Home
Growing Mushrooms for the First Time: Quick Answer
Growing mushrooms for the first time is easier than most people expect — but it does require understanding a process that is quite unlike growing anything else. Mushrooms develop through a series of distinct biological stages, from colonisation through to fruiting and harvest. Each stage demands specific conditions: the right temperature, humidity, airflow, and timing. This guide maps the entire journey from your first preparation steps through to drying and storing your harvest. Whether you are based in the UK or anywhere else, the fundamentals remain the same. Follow the arc laid out here and every individual decision along the way becomes easier to make with confidence.
Understanding the Journey Before You Begin
Most beginners reach for the practical steps before they understand the process. That instinct is understandable, but it tends to create problems. Mushrooms do not grow the way vegetables or herbs do. There is no seed, no soil, and no watering schedule that translates directly from your experience with other plants. What you are working with is a living fungal network — one that moves through distinct biological stages, each with its own requirements and its own logic. Across the UK, home growers increasingly discover this when they dive straight into a first grow without mapping the full process first.
Understanding that arc before you begin is genuinely transformative. When you know what your mycelium is doing at any given moment, you stop second-guessing. You can diagnose problems faster. You can make adjustments with confidence rather than anxiety. Here is the insight most first-timers miss: the grow does not begin when you see mushrooms. It begins long before that, in a dark jar or bag where nothing visible seems to be happening. That invisible phase is where the outcome is largely decided. Build your mental map of the full journey first, and every step that follows will feel connected rather than isolated. Research from the Royal Botanic Gardens highlights how understanding fungal biology underpins successful cultivation at every level [1].
Creating the Right Environment for Your Grow
Of all the variables in a mushroom grow, your environment is the one you control most directly. And that control matters more than beginners typically expect. Mushrooms are acutely sensitive to temperature, humidity, airflow, and light — not in the way that seems dramatic, but in the way that quietly determines success or failure over days and weeks. For UK growers in particular, cooler ambient temperatures during autumn and winter can actually work in your favour when targeting species that prefer a lower fruiting range.
The encouraging news is that you do not need an elaborate setup to get started. A spare corner, a wardrobe, or a small tent can all work well. What matters is not the size or sophistication of your space. What matters is consistency. A grow space that holds steady conditions — even imperfect ones — will outperform a more elaborate setup that fluctuates wildly. Here is something that surprises many first-timers: the balance between airflow and humidity retention is one of the trickier variables to get right, too much dries out pins rapidly, while too little leads to CO₂ buildup and poorly-formed mushrooms. Mushrooms need fresh air exchange, but they also need to retain moisture. Finding that balance is a skill the setup itself should make easier. The guide below takes you through the practical decisions involved in creating a space that delivers that balance reliably.
Choosing Your Method and Preparing Your Substrate
With your environment ready, the next decision is your cultivation method. For most people starting out in the UK, this choice should be driven by simplicity. There are numerous approaches to growing mushrooms — some elegant, some highly technical — but not all of them are appropriate starting points. One method – PF Tek – has particularly earned its reputation as the beginner's benchmark because it requires minimal equipment, produces reliable results, and teaches you the fundamentals of sterile technique without overwhelming complexity.
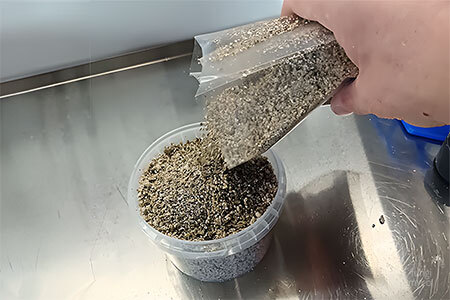
Your substrate — the material your mycelium will colonise and feed from — is equally critical. It is not merely a growing medium. It is a food source, and its composition, moisture content, and preparation quality all directly influence how aggressively your mycelium colonises and how well your grow ultimately performs. The surprising detail many beginners overlook is that over-wet substrate is one of the leading causes of failed grows. It is not an obvious mistake, but it is a consequential one. Getting the substrate right from the beginning sets the foundation for everything that follows. The articles below cover the method and the inoculation steps in full detail.
- Choose a method matched to your experience level and available equipment. For absolute beginners — grow kits such as the Hypha Flux Grow Kit are the perfect starting point — including step-by-step instructions so you can ditch the guesswork.
- Understand what your substrate provides nutritionally for your mycelium.
- Prepare your substrate to the correct moisture content before inoculation.
- Approach inoculation with clean technique to minimise contamination risk.
Watching Your Mycelium Grow and Knowing It Is on Track
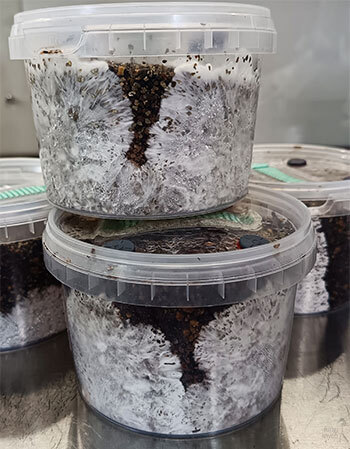
Inoculation done. Now comes the watching and waiting. This phase is genuinely exciting, but it also generates more anxiety among beginners than any other part of the process. Your mycelium is growing, but for the first several days you may see very little evidence of it. Then growth begins. And with it comes a flood of questions that almost every first-timer asks, whether they are growing in the UK or abroad.
Is the growth fast enough? That patch of discolouration, is it contamination or something normal? Why has progress slowed down in the last few days? These are reasonable questions, and having a clear reference point for what healthy colonisation looks like, and roughly when to expect each stage of it, makes this waiting period far easier to navigate. Here is something worth knowing that most guides do not highlight: mycelium can sometimes slow its visible growth before a final push to complete colonisation. This is not always predictable, but it is worth ruling out before intervening. Patience, informed by a clear picture of the expected timeline, is your most useful tool at this stage. The British Mycological Society resources provides resources that can help growers develop a stronger understanding of fungal behaviour throughout the colonisation process [2].
→ The Colonisation Timeline - What to Expect as Mycelium Spreads
Triggering, Harvesting, and Preserving Your First Flush
Full colonisation is a milestone, but it is not the finish line. Left undisturbed, a colonised substrate will not automatically produce mushrooms. You need to trigger fruiting — to send a clear environmental signal that conditions outside are right for the fungus to reproduce. In the wild, this signal comes from dropping temperatures, increased airflow, and changes in light exposure. In your grow space, you replicate those cues deliberately. Many UK growers find that the naturally cooler temperatures in autumn and winter make triggering fruiting noticeably easier during those months.
→ Triggering Mushrooms to fruit
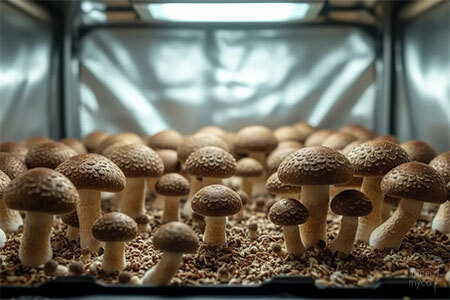
Once pinning begins and your first flush develops, timing becomes everything. Harvesting too early sacrifices yield. Harvesting too late — after the veil beneath the cap has torn and spores have dropped — affects quality and can make subsequent flushes harder to achieve.
→ When & How to Harvest your Mushrooms
After harvest, how you handle your mushrooms determines how long they stay usable. Drying is the most effective preservation method for most home growers. A second or even third flush is often achievable from the same substrate, and each flush teaches you something the previous one did not.
→ How to Dry & Store Homegrown Mushrooms
- Recreate natural environmental cues to initiate the fruiting process
- Monitor pin development closely and harvest before the veil tears
- Allow the substrate to rest and recover between flushes
- Dry your harvest promptly and store it correctly to preserve quality
Frequently Asked Questions
Home mushroom cultivation is very achievable for beginners. Many species are forgiving and well-suited to simple setups. With the right guidance and a clean working environment, most first-time growers produce a successful flush. Our beginner-focused content explains exactly where to start.
You need a few basic materials: a suitable substrate, a spawn source, and a clean space with controlled temperature and humidity. The specific requirements vary by species and method. Our introductory guides walk you through the essentials before you spend anything or commit to a setup.
The timeline varies considerably by species, oyster mushrooms can be done in three to four weeks, while slower species may take twelve or more. Most beginner grows in the UK fall somewhere in the middle. This covers inoculation, colonisation, fruiting, and harvest. Understanding each stage in advance helps you set realistic expectations and avoid common mistakes along the way.
No. Many beginners produce a successful first flush with basic household items and a small, dedicated space. The priority is consistent conditions — temperature, humidity, and airflow — rather than expensive kit. See what equipment you need to get started.
Contamination is the most common cause of failed grows. It usually enters during inoculation or when the grow space is poorly managed. Working cleanly, understanding your substrate, and knowing what healthy mycelium looks like all reduce the risk significantly. For more, see 10 Most Common Mushroom Contaminations.
- Royal Botanic Gardens, Kew — Understanding Plants & Fungi. Available at: https://www.kew.org/sites/default/files/Understanding%20Plants%20and%20Fungi_CPFB%20Strategy.pdf (Accessed 23 April 2026).
- British Mycological Society — Education Resources. Available at: https://www.britmycolsoc.org.uk/education.html (Accessed 23 April 2026).