

Beyond the Basics: From Cakes to Spawn
How to go from cakes to spawn: Quick answer
Going from BRF cakes to grain spawn is usually a pivot point between beginner and intermediate cultivation, that's not to say PF Tek is only for beginners because it depends on the situation. However moving to a proper grain-and-substrate workflow is definitely the next step. Instead of fruiting directly off a colonised cake, mycelium is transferred into sterilised grain spawn, which multiplies growth far more efficiently. That grain then inoculates bulk substrate, giving the volume and consistency a single cake can't match. From there, a proper fruiting chamber controls humidity and airflow, determining how generously the substrate actually produces. Each stage builds on the last, and getting grain-to-substrate ratios right early on shapes everything that follows, right through to harvest.
Starting with the Right Species for Your Setup
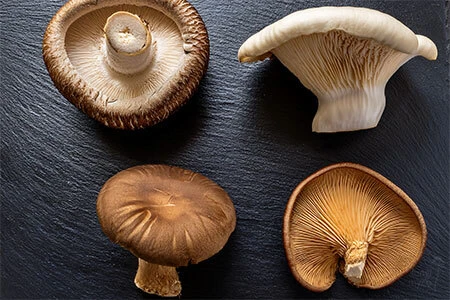
Every successful grow begins with a single, well-informed choice: which mushroom are you actually going to grow? Species are not interchangeable. Each one arrives with its own expectations — particular colonisation speeds, specific substrate preferences, and fruiting conditions that can vary dramatically from one variety to the next.
A species that thrives in a simple, low-intervention monotub setup may perform poorly if given more engineered conditions, and vice versa [1]. Choosing a mushroom genuinely suited to your current skills and equipment is one of the few decisions that costs nothing but pays dividends across every stage that follows .
Oyster mushrooms, particularly pearl and blue oyster varieties, are often considered the most forgiving for growers moving beyond beginner techniques, and they remain among the most popular choices for UK home cultivators for precisely that reason. They colonise aggressively, tolerate a wider range of humidity conditions than many other species, and tend to produce heavy first flushes that are visually impressive and confirm that your process is working.
Building Clean, Reliable Cultures

Once your species is chosen, the next challenge is working with living mycelium in a way that is controlled and repeatable. Agar is the tool that allows you to gain consistent results. By transferring mycelium onto agar plates, you create a transparent window into the health of your culture before it ever reaches expensive grain or substrate.
On agar, contamination is visible early. You can see bacterial spread, mould, or weak mycelial growth at a stage when it costs you almost nothing to discard and start again. This early detection is what makes agar work so valuable as a screening step, it compresses your feedback loop enormously compared to discovering contamination only after it has consumed an entire grain jar or bulk block.
The choice of agar formulation affects what you can observe and how vigorously your mycelium grows in the petri dish. Malt Extract Agar (MEA) is a widely used general-purpose medium that supports healthy mycelial growth across most edible species.
Preparing and Choosing Your Grain Spawn
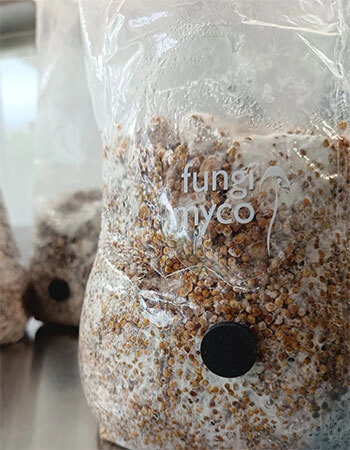
Grain spawn carries colonised mycelium from your agar culture out into a much greater volume of substrate, and the grain you select has a direct effect on how that process unfolds. Rye, millet, popcorn, oats, each behaves differently in terms of moisture retention, colonisation speed, and how cleanly the spawn breaks apart for mixing.
Some grains colonise quickly but hold too much moisture at the wrong stage, increasing contamination risk [2]. Others offer excellent surface area for mycelial contact but can be harder to source consistently or require more careful preparation to reach the right moisture content. Getting grain preparation right — hydrating grains to the correct level, simmering without over-softening, and drying the surface before loading into jars — is a foundational skill that affects the outcome of everything downstream.
Moving from Colonised Grain into Bulk Substrate
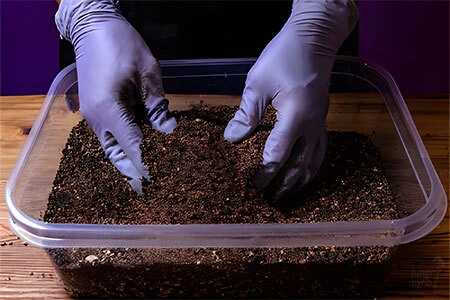
With fully colonised grain jars ready, you reach one of the most satisfying transitions in mushroom growing: moving into bulk substrate. Bulk substrate gives the mycelium a substantially larger food source to colonise, creating conditions for heavier, more consistent harvests across multiple flushes. The transition from grain to bulk also marks a shift from small jars to containers that can support a meaningful harvest.
How much grain you mix relative to substrate volume affects both colonisation speed and contamination risk. Too little spawn and colonisation stalls, leaving your substrate vulnerable for longer. Too much spawn relative to substrate volume wastes your colonised grain without proportionally improving outcomes. A ratio of around one part grain spawn to two or three parts bulk substrate is a frequently cited starting point for many species, though optimising for your specific species, substrate mix, and environment is worthwhile as you gain experience.
Substrate choice follows the species. Pasteurised wheat straw is the traditional bulk substrate for oyster mushrooms and is what most Pleurotus growers reach for first, colonising rapidly and forgiving small errors in preparation. Supplemented hardwood sawdust (often a Master's Mix with soya hulls) is the other widely used option and tends to be favoured for lion's mane, shiitake and higher-yielding commercial oyster grows [3]. Coco coir with vermiculite and gypsum (CVG) is popular for monotub setups and suits coprophilous species particularly well, though it is less commonly used as a primary bulk for the wood-loving Pleurotus species most intermediate growers begin with.
Creating the Right Conditions for Fruiting
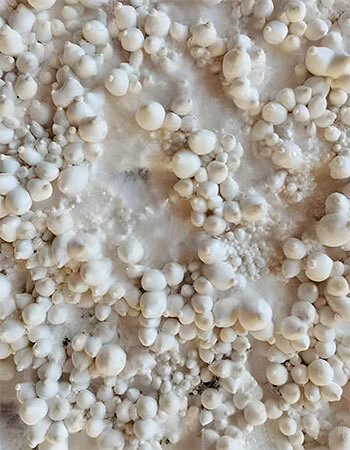
A fully colonised block is full of potential but potential unrealised without the right environmental triggers. Fruiting is an active response to specific conditions, and if those conditions are wrong, mushrooms simply will not pin, or will produce weak, poorly formed fruits that are unsatisfying to harvest and difficult to learn from.
The two most critical environmental variables at this stage are humidity and fresh air exchange (FAE). These two factors are in constant tension with each other: opening your fruiting chamber to introduce fresh air inevitably loses some humidity, while sealing it to retain humidity causes CO₂ levels to rise above the threshold that many species tolerate well. Finding the balance between these two requirements is where fruiting chamber design becomes genuinely important.
Shotgun fruiting chambers, named for the pattern of small holes drilled through all six sides of a clear storage box, use those perforations for passive fresh air exchange and rely on a bed of damp perlite at the base to release moisture into the chamber, maintaining humidity around the block.
Harvesting and Planning Your Next Flush
Knowing when to harvest is a skill that develops quickly through observation, getting the timing right makes a real difference. Most edible species are best harvested just before the veil beneath the cap breaks. For oyster mushrooms this means picking when the cap edges are still slightly curled downward rather than fully flattened out. For lion's mane, harvesting while the teeth are still firm and the overall form is dense produces a mushroom with excellent texture and flavour. Leaving fruits on the block too long does not simply reduce quality in that flush; it also allows the mushrooms to drop spores heavily, which can trigger an immune response in some growers and makes subsequent work in the same room messier and more contamination-prone.
Harvesting technique matters. Twisting and pulling the entire fruiting body cleanly from its base, rather than cutting, removes the stem stub that would otherwise sit on the substrate surface and rot between flushes. That rotting material provides a foothold for contaminants that would otherwise struggle to compete with healthy, actively colonised substrate.
After your first flush is harvested, allow the block surface to recover before initiating the next fruiting cycle. Clear away any remaining stem bases, aborts, or fragments of substrate that came away with the mushrooms, since dead organic matter left on the surface will only decompose and invite contamination. A rehydration soak helps most bulk substrates recover: submerge the block or tub in cool clean water for six to twelve hours, then drain thoroughly and return it to the fruiting chamber. Reset humidity and fresh air exchange as you did for the first flush. Second flush pins typically appear within seven to fourteen days, and most well-prepared blocks will produce two to four flushes before yields drop off meaningfully and the substrate is spent.
FAQs
Timelines vary by species and method, but most growers should expect four to ten weeks from culture to first harvest when working through the full process. Agar work typically takes one to two weeks to produce a confident, clean culture ready for grain inoculation. Grain colonisation adds another three to six weeks depending on species and temperature. Bulk colonisation runs for a further one to two weeks, and fruiting initiation to first harvest can take anywhere from five days for fast-pinning oyster species to two weeks or more for shiitake. Planning ahead and understanding each stage helps you avoid unnecessary delays caused by waiting for jars or blocks that are not yet ready. Keeping a simple log of dates and observations at each stage makes it far easier to identify bottlenecks in your process and address them systematically rather than guessing. Many growers find that staggering multiple grows — starting new grain jars while existing blocks are fruiting — keeps the overall operation running efficiently and ensures a more consistent supply of fresh mushrooms rather than feast-and-famine cycles tied to single-block timelines.
Not necessarily. Some growers skip agar work and start with ready-made grain spawn or inoculated substrate blocks, which can produce good results. However, understanding the full workflow gives you far greater control over quality, consistency, and troubleshooting capability. If something goes wrong, at some point it will, knowing what each stage looks like when it is healthy makes it much easier to identify where a problem entered your process. Each stage in this guide builds on the last, so the more completely you understand the journey, the better your long-term results tend to be. Skipping agar work, for example, means relying entirely on the quality of your source culture without any opportunity to inspect or select from it before it enters grain. That can work well with a high-quality culture from a trusted source, but it removes one of the most powerful diagnostic tools available to you. Those who do take the time to learn agar technique often report that it changes how they think about the whole process, not just as a practical skill but as a way of developing genuine insight into mycelial health and behaviour.
Contamination is the most common cause of failed grows at this level, and it can enter at almost any stage. From agar work through to fruiting. The most frequently overlooked contamination risks are incorrect grain moisture during preparation, working in still-air with poor technique rather than good technique, and moving grain spawn to bulk substrate before colonisation is genuinely complete. Good hygiene, correct moisture levels at every stage, and confidence that your grain is fully colonised before mixing into bulk substrate all reduce your risk significantly. Understanding where contamination risk is highest at each step helps you direct your attention where it matters most. It is also worth recognising that some level of contamination is a normal part of learning, and a single failed jar or block should be treated as information rather than failure. Experienced growers lose grows too, the difference is that they understand why, they adjust, and they move forward. Keeping your workspace clean, your movements deliberate, and your records detailed transforms contamination events from frustrating mysteries into solvable problems with identifiable causes and specific remedies.
It's recommended to scale up incrementally rather than investing heavily in equipment before you understand your process. Monotubs built from standard large plastic storage containers, still-air boxes made from clear storage boxes, and simple pressure cookers for sterilisation are the core tools for intermediate growing and none of them require significant financial outlay. The key is understanding what your mushrooms actually need at each stage, appropriate humidity, fresh air exchange, and stable temperature. Then solving for those requirements with whatever practical setup is available to you. Expensive equipment does not compensate for poor technique or incomplete understanding of the process. A grower with a thorough understanding of fruiting conditions who uses a basic plastic tub with drilled holes will consistently outperform a grower with sophisticated automated equipment but limited understanding of what their mushrooms actually need. Invest in understanding first, and let equipment purchases follow naturally from the specific limitations you encounter in your actual grows rather than from aspirational setups seen online.
Fully colonised grain jars show dense, unbroken white mycelium covering every visible grain surface when viewed through the glass. There should be no visible gaps, no patches of bare grain, and no discolouration that might indicate competing organisms. Giving the jar an additional week after it appears visually complete, often called consolidation time, allows the mycelium to fully knit through the interior of the jar, not just the surfaces visible through the glass. Jars moved to bulk substrate too early are a significant contamination risk: the uninhabited interior portions of the grain become vulnerable once they are mixed into a less-sterilised bulk substrate environment. A useful additional check is to gently shake the jar and observe how the grain clumps break apart, fully colonised grain tends to hold together in dense, spongy masses rather than flowing freely as uncolonised grain does. If your jar passes the visual check and the shake test, and you have waited the full consolidation period, you can move to bulk with confidence. When in doubt, wait another two days the cost of waiting is minimal compared to the cost of a contaminated bulk block.
- Stamets, P., Mycelium Running: How Mushrooms Can Help Save the World, 2005.
- Royal Botanic Gardens, Kew — State of the World's Plants & Fungi. Available at: https://www.kew.org/science/state-of-the-worlds-plants-and-fungi.
- Dawadi E, Magar PB, Bhandari S, Subedi S, Shrestha S, Shrestha J — Nutritional and post-harvest quality preservation of mushrooms: A review. Available at: https://pmc.ncbi.nlm.nih.gov/articles/PMC9747598/