
Inoculating Mushroom Spores for the First Time
How to Inoculate Mushroom Spores the First Time: Quick Answer
To inoculate mushroom spores for the first time, work inside a still air box, flame-sterilise your needle, and shake the syringe for 30 seconds. Inject 0.5–1ml per port into a pre-sterilised PF Tek Kit, needle at 45 degrees. Using a grain bag instead? Use roughly 3ml — too much moisture causes problems later, and one syringe already holds tens of thousands of spores. Seal any holes with micropore tape, then label everything with species and date. Keep it warm and dark at 18–24°C. I usually spot white mycelium within 5–14 days — that's when you know it's working.
Understanding Spore Syringes and Liquid Cultures
Before your first inoculation, it helps to know exactly what is inside your syringe, because the two main inoculation media behave quite differently once they meet a substrate.
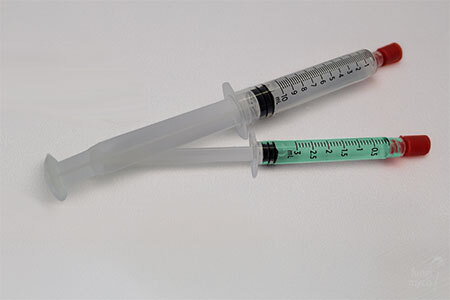
A spore syringe holds ungerminated fungal spores suspended in sterile water. Spores are the reproductive cells of the fungus — think of them as seeds. They have not yet begun to grow, so contamination pressure during storage is low: there is nothing actively metabolising for competitors to feed on. That makes spore syringes a forgiving starting point. Colonisation is slower than with liquid culture, usually showing first growth within 5–14 days, but the margin for error during handling is wider.
A liquid culture syringe holds living, actively growing mycelium in a dilute nutrient solution [1]. Because the mycelium is already germinated, colonisation begins the moment it is injected and runs noticeably faster — visible growth often appears within 3–7 days. The trade-off is that any contamination introduced during inoculation now has an actively growing competitor to fight, so confident sterile technique matters more.
Both media suit home cultivation. The underlying biology is straightforward: spores must germinate before colonisation can begin, whereas liquid culture skips that stage entirely. In practice, liquid culture is the faster choice for experienced growers, while spore syringes suit beginners who want simplicity. Store either at 4°C in a sealed bag, away from light, and never freeze them — ice crystals rupture spores and damage mycelium alike. Used within their stated shelf life, both will serve a first-time grower well.
Choosing Your Method and Setting Up Your Workspace
There are three main inoculation routes: spore syringe, liquid culture syringe, and agar. Most beginner guides present them as equals. They are not — at least not for a first attempt.
For a first inoculation, use a spore syringe into a pre-sterilised PF Tek kit or pre-sterilised grain bag. That single choice removes the two biggest failure points beginners face: preparing sterile grain, and managing contamination pressure through colonisation. Liquid culture colonises faster but rewards growers who already handle sterile work confidently. We'd recommend PF Tek at first then grain bags — and agar — are the logical next steps, not the first.
Everyone suffers contamination at some point, it's far more likely in the beginning, if you can reduce the number of failure points you stand a much better chance of success. My own first inoculation was into grain bags, I made number of mistakes and used too much grain and it ended up contaminating. Using a pre-sterilised PF Tek kit or a pre-sterilised bag helped.
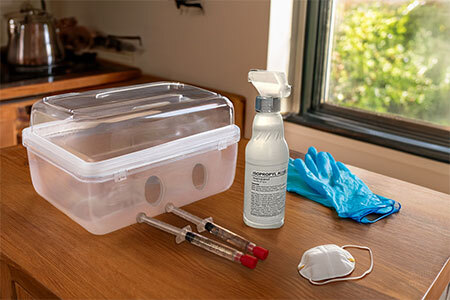
With the method settled, the workspace is what matters. You do not need a laboratory — you need a clean, still space and a short list of reliable tools: a spore or liquid culture syringe, a sterile substrate, 70% isopropyl alcohol (IPA), nitrile gloves, a face mask, and a still air box. A still air box — a clear storage box with two arm holes — is plenty for home work; a laminar flow hood is not needed for a beginner.
Airing cupboards and kitchen worktops are the most common setups in smaller homes. Sterilise the workspace in order: wipe the inside of the still air box with IPA, let the alcohol evaporate fully, put gloves and mask on before reaching in, and move slowly and deliberately. Fast movements churn the air; slow ones leave it settled.
Species matters too. In a typical airing cupboard at 18–24°C, oyster mushrooms are the most forgiving and fastest to colonise. Lion's mane, shiitake and king oyster are all good choices once you have one successful run behind you.
Step-by-Step: How to Inoculate Your First Mushroom Grow
Follow these steps carefully and a first inoculation will go smoothly. Each one exists for a reason — skip a step and you raise the risk; follow all six and you give the mycelium the best possible start.
For a visual walkthrough alongside these steps, our guide to inoculating grain with a spore syringe is a useful companion.
- Prepare and sterilise the still air box. Wipe all internal surfaces with 70% IPA and let it evaporate. Put on nitrile gloves and a face mask before reaching inside.
- Shake the syringe vigorously for 30 seconds. This spreads the spores or mycelium evenly through the solution. A settled syringe delivers uneven colonisation.
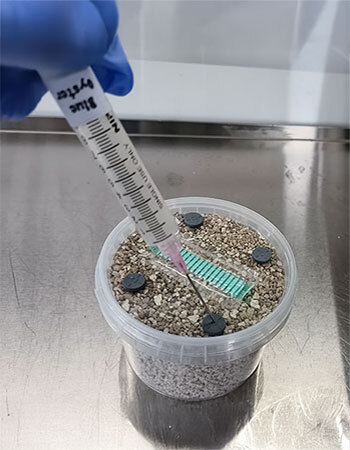
- Flame-sterilise the needle. Hold the tip in a lighter flame until it glows red, count to ten, then let it cool. Wipe the kit's injection port with a fresh alcohol wipe.
- Inject For a PF Tek kit, use around 0.5-1ml of spore or liquid culture solution per injection port. For a grain bag, use roughly 3ml per bag. Work slowly — do not rush this step.
- Seal the injection point. If the kit has no self-healing port, cover the hole with micropore tape as soon as the needle is withdrawn.
- Label and set aside. Write the species and inoculation date on the pot or bag, place it somewhere warm and dark at 18–24°C, and leave it undisturbed for at least the first 72 hours.
All measurements in this guide are metric, as standard for UK cultivation. If you would rather start with the guesswork removed, our Hypha Flux PF Tek Kit is the lowest-risk entry point for a first inoculation — a pre-sterilised substrate with self-healing injection ports.
Incubation, Troubleshooting, and Common Mistakes
After inoculation, put the kit or grain bag somewhere warm, dark and undisturbed. Airing cupboards are ideal — they typically hold 20–25°C, comfortably within range for most gourmet species. Oyster's 20-27°C, lion's mane do well at 20–24°C; shiitake prefers 20–25°C. No light is needed during this phase.
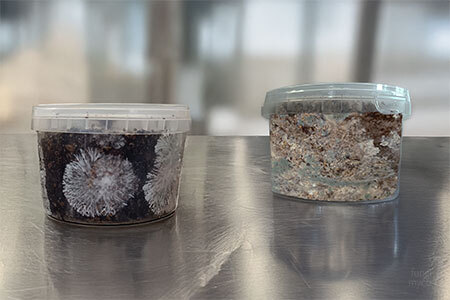
With a spore syringe, expect the first white growth within 5–14 days; liquid culture usually shows within 3–7. Full colonisation of a PF Tek pot takes around four weeks depending on the strain. Healthy mycelium is bright white, fluffy or ropy, and spreads evenly outward from each injection point. What you do not want: green patches (Trichoderma), black or dark grey areas (Aspergillus), or pink growth (Neurospora). Healthy colonisation smells earthy and faintly mushroomy — never sharp or chemical.
Contamination on a first run is not failure — it is information.
My own first bad contamination was as a result of putting too much spore solution in the bag, too much moisture allows contaminants to thrive and subsequently i had to start again
Whatever the cause, double-bag a contaminated substrate straight away, do not open it indoors, and bin it — do not try to salvage it. Slow or absent growth is almost always a temperature problem, especially through autumn and winter; a cheap digital thermometer in the airing cupboard settles that question immediately.
Check your syringe storage too. Stored at 4°C, spore syringes stay viable for 6–12 months. Never freeze them — ice crystals rupture the spores. An expired or heat-damaged syringe will show little or no colonisation regardless of how good your technique is. If you are splitting one syringe across several bags, use a fresh, alcohol-wiped needle for each injection point.
A winter grow of mine once did nothing for two weeks, and I had assumed the syringe was dead. It was not — the airing cupboard was simply running cold. Now a thermometer goes in first.
Once a grain bag reaches 30–50% colonisation, the break-and-shake technique redistributes the mycelium and speeds up full colonisation. Do not do this with PF Tek pots — their substrate colonises as a single coherent mass, and breaking it up only sets the grow back.
Frequently Asked Questions
The easiest method for a beginner is injecting a spore syringe into a pre-prepared PF Tek grow kit. These kits provide a ready-sterilised substrate with self-healing injection ports, so you do not need to prepare grain bags yourself. Work inside a still air box and use around 0.5-1ml of spore or liquid culture solution per injection port.
A spore syringe contains ungerminated fungal spores suspended in sterile water — colonisation is slower but contamination pressure is lower. A liquid culture syringe contains actively growing mycelium, which colonises substrate faster but needs more careful sterile handling. Beginners can use either; liquid culture typically shows visible growth sooner.
With a spore syringe, expect the first white mycelium growth within 5–14 days at 18–24°C. Liquid culture syringes typically show growth within 3–7 days. Full colonisation of a PF Tek pot takes two to four weeks. If nothing is visible after 14 days, check the temperature and whether the syringe was shaken before use.
Yes — inoculating spores of gourmet species such as oyster, shiitake, lion's mane and king oyster mushrooms is entirely legal in the UK. Germinating spores of psilocybin-containing species, however, constitutes production of a Class A controlled substance under the Misuse of Drugs Act 1971. All FungiMyco products relate exclusively to legal gourmet species [2].
Contamination is most often caused by inadequate sterilisation, poor inoculation technique, or damaged jar lids. Prevent it by sterilising jars thoroughly, working inside a still air box or flow hood during inoculation, flame-sterilising your needle, and wiping injection ports with isopropyl alcohol before each use.
Still have questions? The FungiMyco team is happy to help — get in touch with us directly and we will point you in the right direction.
1: Reddit - What is the difference between a liquid culture and a spore solution. Available at: https://www.reddit.com/r/MushroomGrowers/comments/1emgv1h/general_what_is_the_difference_between_a_liquid/ (Accessed 21 April 2026).
2: UK Government - Misuse of Drugs Act 1971. Available at: https://www.legislation.gov.uk/ukpga/1971/38/contents (Accessed 23 April 2026).