
Triggering your Mushrooms to Fruit
Triggering Mushrooms to Fruit: Quick Answer
Getting a fully colonised block to fruit is the stage every grower looks forward to — and the one that most often goes wrong. Mushrooms will not fruit under colonisation conditions. They need four environmental shifts: a drop in temperature, more fresh air, higher humidity, and indirect light. An enclosed fruiting chamber is the most reliable way to deliver all four at once, particularly in a UK home where central heating works against you. This guide covers each stage — reading your block, spawning to bulk, triggering pins, choosing a setup, comparing species, and fixing the common problems. If you are starting out, our grow kits are a straightforward way in.
What 'Triggering Mushrooms to Fruit' Actually Means — and How to Read Your Block
Many first-time growers treat colonisation and fruiting as one continuous process [1]. They are not — they are two biologically distinct stages, and confusing them is one of the most common reasons a block stalls.
During colonisation, mycelium is in vegetative growth: building structure, digesting substrate, and spreading its hyphal network through the block. The conditions it prefers — warmth of around 24–28°C, darkness, and elevated CO₂ — actively suppress reproduction. Fruiting begins when the mycelium picks up environmental signals that conditions have changed and reproduction is now worthwhile: a drop in temperature, more airflow, higher humidity, and light. A fruiting chamber recreates those cues deliberately and reliably indoors.
A few terms worth knowing. Primordia are the earliest pinheads — tiny white knots of hyphal tissue. A pin is a small, differentiated fruiting body. A flush is a wave of fruiting bodies developing together. The substrate block is the colonised growing medium that fuels all of it.
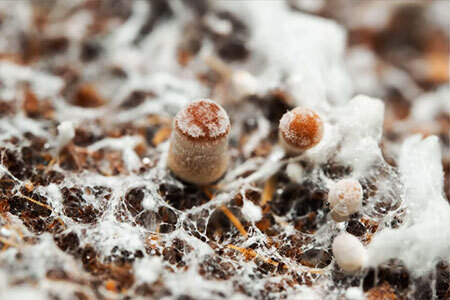
Do not rush the transition — but read the right signals for what you are growing. A fully colonised grain spawn block or PF Tek cake should be covered in dense, uniform white mycelium, with no substrate showing through, and feel firm and almost solid when pressed gently. A bulk substrate behaves differently: it will not always show a clean, uniform white surface even when it is ready, and pinning can begin while parts of the surface still look patchy. With bulk, judge readiness by the substrate being colonised right through — often visible as white through the sides of the tub — and by the surface starting to knot, rather than by a perfect white sheet. In every case, small knotted clusters forming at the edges or surface are early primordia signalling readiness. A slight yellowing is normal metabolite secretion; bright discolouration with a foul smell is not, and needs dealing with straight away.
A simple readiness check: is the substrate colonised right through, does it feel firm and consolidated, and are there no green, black or foul-smelling patches? If all three are yes, it is ready. It is worth the patience — fruiting too early consistently gives a thinner pin set and a higher contamination risk, so waiting pays directly into the harvest.
Spawning to Bulk Before You Fruit
Not every grow goes straight from a colonised block to fruiting. Many growers take a step in between — spawning to bulk — and it is worth understanding before you set up fruiting conditions, because it changes both how much you harvest and how you read the substrate.
Spawning to bulk means mixing your fully colonised grain spawn into a larger volume of bulk substrate: a low-nutrient, water-holding medium such as pasteurised straw for oysters, supplemented hardwood sawdust, or a coir-based mix [2]. The colonised grain provides the energy and the inoculation points, and the mycelium then runs out into the bulk. The point of it is yield — bulk substrate adds volume and water without you having to colonise a large, nutritious, and therefore contamination-prone, quantity of grain. A modest jar of spawn can colonise several times its own volume of bulk.
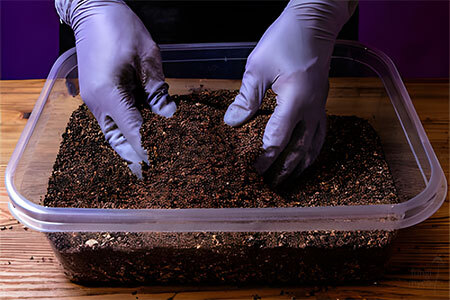
The process is straightforward, but cleanliness still matters. Work in a still air box or a clean, draught-free space. Prepare the bulk substrate to field capacity — wrung-out-sponge moisture — and let it cool fully to room temperature. Break the colonised grain up and mix it through the bulk thoroughly and evenly, so the inoculation points are well distributed. A spawn-to-bulk ratio of around 1:2 by volume is a safe, fast choice for a beginner; more experienced growers stretch it to 1:4 or so for greater yield, at slightly higher risk. Pack the mix into your fruiting container — a tub works well — and return it to colonisation conditions.
Give the bulk a week or two to colonise through before you introduce fruiting conditions. As noted above, do not wait for a flawless white surface here: bulk substrate is ready when the mycelium has run through it and the surface begins to knot, and pinning often starts before the top looks uniformly white.
The 4 Environmental Triggers: Humidity, Fresh Air Exchange, Temperature, and Light
Get these four variables right and most healthy colonised blocks will pin. Get even one of them consistently wrong and they will not.
Humidity is non-negotiable. Most gourmet species need 85–95% relative humidity to start and sustain fruiting. A centrally heated home typically sits at 30–50%, sometimes lower in winter — an enormous gap. Misting two or three times a day, together with an enclosed fruiting chamber, is the practical answer. Mist the walls of the chamber rather than the block or the developing pins: pooled water on pin tissue causes aborts and invites bacterial rot.
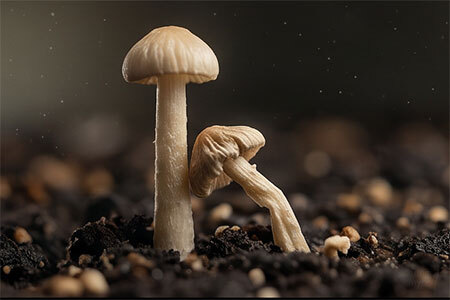
Fresh air exchange (FAE) is the most overlooked trigger. CO₂ needs to fall — below roughly 1,000 ppm — to signal a fruiting environment, and in a sealed container it builds quickly from the mycelium's own respiration. Polyfill-stuffed holes in a simple chamber allow passive exchange without crashing the humidity. Without enough FAE, pins either refuse to form or stretch into long, leggy stems as the mycelium reaches for cleaner air.
Temperature matters too, and the drop itself is the signal. Most gourmet species pin best after a 2–5°C fall from their colonisation temperature. Rough targets: oyster 12–18°C, shiitake 10–16°C, lion's mane 18–24°C, chestnut 14–18°C. In a UK autumn or spring, ambient temperatures often fall naturally into the oyster and shiitake fruiting ranges, so no active cooling is needed for those species in those seasons.
Light completes the picture. Mushrooms do not photosynthesise — they have no chlorophyll — but they use light as a directional cue, orienting the fruiting bodies towards the source. Twelve hours of indirect ambient light a day is enough for any common gourmet species; a north-facing windowsill does the job perfectly well. No single one of these four factors triggers fruiting on its own — they have to converge.
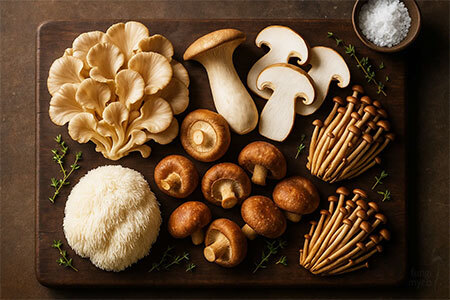
Species Fruiting Conditions Compared: Oyster, Shiitake, Lion's Mane, and Chestnut
Generic fruiting advice tends to assume you are growing a single species. Most home growers are not. Here is a direct comparison of four popular legal gourmet varieties, all fully legal to grow in the UK.
|
Species |
Fruiting Temp (°C) |
Humidity % |
FAE Need |
Light Need |
Avg Days to Pin |
Flushes Expected |
|---|---|---|---|---|---|---|
| Oyster | 13–21°C | 85–95% | High | Low–Moderate | 5–10 | 3–4 |
| Shiitake | 12–20°C | 80–90% | Moderate | Moderate | 7–14 | 3–4 |
| Lion's Mane | 18–24°C | 85–95% | Moderate | Low | 7–12 | 2–3 |
| Chestnut | 15–21°C | 85–95% | Moderate | Moderate | 7–14 | 3–4 |
Oyster mushrooms are the most forgiving for beginners — they pin reliably even in cooler conditions and respond quickly to a basic chamber. If you are new to all this, our first-time grower's guide covers the full process from inoculation through to first flush.
Shiitake benefits from a deliberate cold shock — 24 hours at 8–10°C — to break primordia dormancy. A grower with an unheated outbuilding or garage in autumn has an advantage here: the cold does the triggering for you, as long as the chamber holds the humidity.
Lion's mane needs particular attention to steady humidity. Brown, crispy edges on the developing white pom-pom are an immediate sign of a humidity crash, common in centrally heated rooms in winter. Keep a hygrometer in the chamber and mist before it drops, not after.
I lost most of a lion's mane pom-pom this way myself — a centrally heated room dried the chamber out overnight before I had a hygrometer in there. One lives in every chamber I run now.
Chestnut mushrooms are underrated. They tolerate a wide temperature range, crop reliably over several flushes, and are genuinely handsome at harvest — worth growing alongside an oyster block for the comparison.
Maximising Yields: Getting the Most From Every Flush
A single flush is a good result. Three or four from the same block is excellent growing, and it is well within reach with the right post-harvest technique.
The most important step after the first flush is rehydration. Fruiting depletes a good part of the block's moisture, and simply returning a spent block to fruiting conditions without addressing that will give a weak second flush, or none at all. The fix is cold-water dunking: submerge the block fully in cold water for 12–24 hours — a bucket or large bowl is fine — then drain it and return it to the chamber. That replenishes the moisture and sends a fresh reset signal to the mycelium.
My own first attempt at a second flush was a disappointment — I put the spent block straight back without rehydrating it, and barely a handful of mushrooms came. A proper cold-water dunk made all the difference the next time.
Harvest timing matters as well. Pick just before, or as, the veil beneath the cap begins to tear — before the spores drop. A heavy spore release coats kitchen surfaces and, with prolonged exposure, can irritate airways. Harvesting at the right moment also keeps the block's energy in reserve for later flushes rather than spent on reproduction.
Between flushes, give the block a rest of 5–7 days at lower humidity before rehydrating and bringing back full fruiting conditions. That rhythm mimics the natural wet-dry cycling that drives repeat fruiting in the wild. A well-managed block will usually give three to four flushes before the substrate is genuinely spent.
If you are regularly getting fewer than two flushes, look again at substrate quality — starting with a properly sterilised, nutritionally dense block removes one of the biggest limits on yield. Our sterilised mushroom substrates are formulated for multi-flush indoor growing.
Frequently Asked Questions
It depends on what you are growing. A grain spawn block or PF Tek cake is ready when mycelium covers it entirely as a firm, consolidated white mass. A bulk substrate is read differently — it will not always show a uniform white surface, so judge it by the substrate being colonised right through and the surface starting to knot, rather than by a perfect white top. In both cases, slight yellowing and early pinning at the edges are good signs. Reaching this point usually takes two to four weeks, depending on species and temperature.
Four environmental shifts trigger indoor fruiting: a temperature drop of 2–5°C, increased fresh air exchange to reduce CO₂, relative humidity raised to 85–95%, and exposure to indirect light. In a centrally heated home, these are best achieved with an enclosed fruiting chamber to counteract dry air.
Most gourmet mushrooms need 85–95% relative humidity to initiate and sustain fruiting. Centrally heated homes often drop to 30–50%, which makes regular misting or an enclosed fruiting chamber essential. Avoid misting directly onto developing pins, as pooled water can cause aborts and bacterial contamination.
The most common causes are insufficient fresh air exchange, low humidity, or a temperature still at colonisation levels. Central heating is a frequent culprit — it dries the air and keeps temperatures too high. Introduce a fruiting chamber, drop the temperature by 3–5°C, and increase airflow to resolve most cases.
Mushrooms do not photosynthesise, but they use light as a directional cue for fruiting body development. Indirect ambient light on a 12-hour cycle is sufficient for most gourmet species, including oyster, shiitake and lion's mane. Direct intense light or heat from grow lights should be avoided.
1: Darby, D. Introduction to Mushroom Growing. Available at: https://www.lowimpact.org/posts/infoarticle/introduction-to-mushroom-growing/ (Accessed 1 May 2026).
2: Moore, D. Industrial Cultivation Methods. Available at: https://www.davidmoore.org.uk/21st_century_guidebook_to_fungi_platinum/Ch11_06.htm (Accessed 3 May 2026).