
The 4 Stages of Mushroom Growing
The 4 Stages of Mushroom Growing: Quick Answer
The four stages of growing mushrooms are inoculation, colonisation, fruiting and harvesting. You begin by introducing a culture to a substrate; the mycelium spreads through that substrate during colonisation; a shift in conditions then triggers pins, which develop into mushrooms; and finally you harvest before the caps open fully and drop their spores. Each stage has its own conditions and timings, and each builds on the one before — which is why understanding all four matters more than mastering any single one. If you are starting from scratch, our beginner grow kits bring the early stages together in one box.
Stage 1: Inoculation – How It All Begins
When a grow fails, it can very often be traced to one thing: the grower did not fully grasp what at least one of the stages needed. The four stages are sequential, and each builds directly on the last, so the logic is worth understanding before you start rather than learning it mid-grow.
Inoculation is where it begins — introducing a mushroom culture to a substrate, the medium the mycelium will go on to colonise [1]. It is a little like sowing a seed, except the seed can take three forms. Spores are the raw genetic material, shed naturally by mature mushrooms. Liquid culture is live mycelium suspended in a nutrient solution, generally faster and more predictable than spores. Grain spawn is mycelium already established on a cereal grain such as rye or wheat. For anyone starting out, we would point you towards grain spawn — it takes hold quickly, and a fast start gives contamination less of a window.
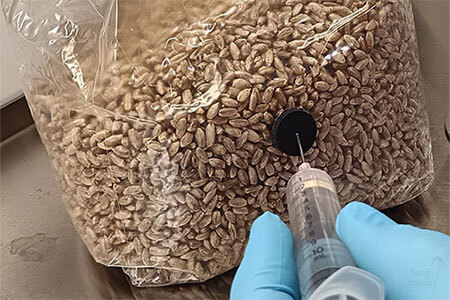
Sterile technique is not optional at this stage; it is the whole game. Any contamination introduced now will only compound through every stage that follows. Work inside a still air box or in front of a flow hood, flame-sterilise your needle, and move quickly and deliberately — a single lapse can cost weeks. Substrate choice matters too. Oyster mushrooms do well on straw or hardwood sawdust; lion's mane prefers hardwood; most gourmet species have their own preference. Matching the species to the right medium is part of the inoculation decision, so it is worth a little reading before you begin.
For a step-by-step walkthrough — grain preparation, syringe technique, and keeping contamination out from the first move — see our guide to inoculating a mushroom medium.
Stage 2: Colonisation – Mycelium Takes Over
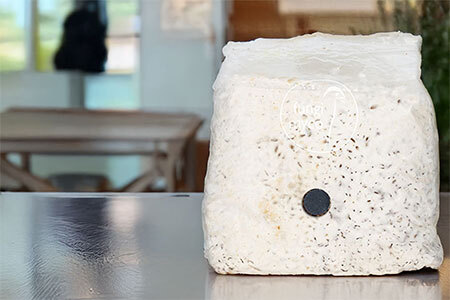
Once inoculated, the waiting begins. Colonisation is the period when mycelium spreads thread by thread through the substrate, digesting nutrients and laying the biological groundwork for fruiting. It is quiet work, and easy to under-rate, but it is the most important thing happening in your grow.
Healthy mycelium is white and fluffy — sometimes almost like cotton wool, sometimes forming the thicker, rope-like strands called rhizomorphs [2]. Anything green, black, pink or orange is contamination. Act quickly: isolate the affected jar and move it well away from your grow space before it can reach the others. If you are not certain what you are looking at, our Contam Buster will identify it from a photo.
Temperature is at the heart of good colonisation. Most species colonise well between 20 and 25°C, though some tolerate slightly cooler conditions. In a typical UK home without climate control, holding a steady temperature through autumn and winter takes a little thought — a propagator mat, or a small dedicated space, makes a real difference. Humidity needs no attention here; the sealed substrate holds its own moisture. Nor does light — mycelium grows perfectly well in the dark, so a cupboard or a box is ideal.
Slow colonisation is often the first sign that something is off. Check the temperature first, then think back to whether the substrate moisture was right at preparation. The longer colonisation drags on, the more chance contamination has to take hold, so anything slowing it down is worth addressing promptly. Colonisation is complete when the whole substrate is covered in dense, healthy white mycelium with no bare patches — and only then are you ready to move to fruiting. I made exactly this mistake myself so I can attest that a little patience here pays off at every stage that follows.
This guide to monitoring early colonisation covers what to look for day by day, including how to tell healthy growth from early contamination before it becomes a real problem.
Stage 3: Fruiting and Pinning – When Mushrooms Start to Appear
Fruiting does not happen on its own. The mycelium needs a trigger — a change in its surroundings that signals it is time to reproduce. Usually that trigger is a combination of more fresh air, a slight drop in temperature, and a change in humidity. In practice, for most home growers, it means taking the colonised block out of its sealed container and into a fruiting chamber or tent.
Primordia — pins, in everyday terms — are the first visible sign that fruiting has started: tiny white or grey bumps on the surface of the substrate. Within a few days they take on recognisable mushroom shapes. Humidity through fruiting should sit between 85 and 95%. Fresh air exchange matters just as much. CO₂ builds up quickly in a closed space, and too much of it produces long, thin, small-capped mushrooms — a reliable sign of poor ventilation. Fan the chamber a few times a day if it is not automated, or run a low-flow fan on a timer.
Light has a supporting role. Mushrooms do not photosynthesise, but a little indirect light helps them orientate and develop normally. A few hours of natural daylight, or a basic LED, is plenty for most species.
Season makes a difference worth knowing about. Cooler months can slow pinning, but they often produce denser, more robust fruiting bodies; warmer months may need more frequent attention to humidity, as the surface dries faster between mistings. It is also worth being clear on the difference between pinning — the first appearance of primordia — and full fruiting-body development, because that distinction is what lets you time the harvest well. Pins are fragile; leave them undisturbed and hold your conditions steady until the caps begin to open.
For more, check when and how to push your mushrooms to fruit.
Stage 4: Harvesting, Multiple Flushes, Timelines, and Troubleshooting
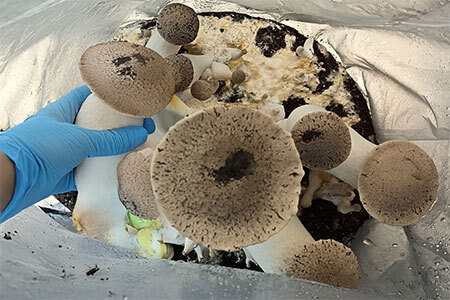
Harvest timing is where a lot of growers stumble. Leave the mushrooms too long and the veil under the cap tears. I learned this one the hard way. The spores drop, and both flavour and shelf life suffer. The visual cues are clear once you know them: the caps should still be curling inward slightly at the edges — not flat, not turned up — and the veil beneath should be intact. White spore dust on the substrate below means you have waited too long.
Technique matters more than most beginners expect. Take hold of the base of the cluster and twist gently while pulling upward — this lifts the mushrooms cleanly, without the torn stumps that can become sites for bacterial rot on the block. Many growers work in nitrile gloves, which is sound practice both for hygiene and for protecting the mycelium.
After the first harvest, let the block rest. Wipe away any debris, mist it lightly, and return it to fruiting conditions. A second flush will usually appear within one to two weeks, and a healthy block commonly gives two or three flushes before the mycelium is exhausted. Some growers dunk the block in cold water for a few hours between flushes to rehydrate it — a technique often called cold shocking, which can help trigger the next flush more reliably.
Knowing the rough timelines for each stage lets you troubleshoot without panicking. Colonisation runs anywhere from one to four weeks. Pins usually appear within three to seven days of triggering fruiting conditions, and mushrooms reach peak maturity five to twelve days after that. The problems that come up most often are contamination from imperfect sterile technique, slow colonisation from low temperatures, no pins from insufficient fruiting triggers, and long, leggy mushrooms from poor ventilation — and each one points back to a specific stage.
For harvest cues by species and how to handle the block between flushes, our harvesting guide is worth reading before your first pins appear.
Frequently Asked Questions
The four stages are inoculation, colonisation, fruiting and harvesting. Each has its own conditions, timings and goals, and each builds on the one before — so growing well is really a matter of understanding all four rather than any single one.
Colonisation is the stage when mycelium spreads through the substrate after inoculation, appearing as white, fluffy threads working across the grain or growing medium. It usually takes one to four weeks, depending on the species and your conditions.
Harvest just before the veil under the cap tears open, while the caps are still curling slightly inward at the edges. Picked at that point, mushrooms are at their best for flavour, texture and shelf life.
Yes — growing edible mushrooms at home is a legal and popular hobby across the UK. Common species such as oyster and lion's mane do well indoors with basic equipment, and you need neither much space nor specialist tools to begin.
Inoculation takes only a few minutes. Colonisation runs one to four weeks. Pinning usually begins within a few days of triggering fruiting conditions, and mushrooms are typically ready to harvest five to twelve days after the first pins appear.
1: Turner, K. (n.d). How to Grow Mushrooms at Home. Available at: https://www.lovethegarden.com/uk-en/article/how-grow-mushrooms (Accessed 30 March 2026).
2: WikiPedia - Mycelial Cord. Available at: https://en.wikipedia.org/wiki/Mycelial_cord (Accessed 6 April 2026).