
Colonisation Timelines - What to Expect & When
How does Mycelium Colonise a Medium? — Quick Answer
Mycelium colonises a medium by spreading through it like roots, breaking down nutrients and absorbing them as it grows — this process begins when mushroom spores are inoculated into a suitable substrate. A network of mycelium begins to grow — thousands of fine, thread-like filaments spreading through the material. It is commonly known as colonisation, or the spawn run, and it is necessary before a single mushroom appears. For most species grown at home in the UK, colonisation takes between 14 and 35 days in a warm room. The denser and healthier that network becomes, the more reliable your eventual harvest.
How Long Does Mycelium Take to Colonise? UK Timelines by Species
There is no single answer to how long colonisation takes — but there are reliable ranges, and knowing them will stop you worrying unnecessarily at day ten.
Species is the biggest factor. Oyster mushrooms are quick, typically colonising in 14–21 days in good conditions. Shiitake and lion's mane are slower and steadier, usually 14–35 days. King stropharia is slower again, often 21–45 days. All of these assume consistent warmth and healthy spawn — the two variables home growers most often underestimate.
On one of my own early grows I was convinced a quiet bag had failed by about day twelve. It had not — it simply needed another week, and went on to fruit perfectly well.
|
Species |
Substrate |
Avg. Days |
Ideal Temp (°C) |
|---|---|---|---|
| Oyster (Pleurotus) | Straw / Hardwood | 14–21 | 22–27 |
| Shiitake | Hardwood | 14–35 | 20–25 |
| Lion's mane | Hardwood / Grain | 14–35 | 20–24 |
| King stropharia | Straw / Wood chip | 21–45 | 20–25 |
Beyond species, a few things shift the timeline. Spawn-to-substrate ratio matters a great deal: a higher inoculation rate means more starting points, and more starting points means faster colonisation. Liquid culture consistently outpaces spore syringes — often colonising 30–50% faster — because it introduces active, already-germinated mycelium rather than dormant spores. Substrate density plays a part too: tightly packed substrate slows the spread, while looser grain lets it move quickly.
Season is worth taking seriously. In an unheated room in January, indoor temperatures can sit at 12–15°C, well below what most species want. Autumn, by contrast, suits cool-tolerant varieties like shiitake well — the natural temperature of many homes lines up with what they prefer, with no extra warming needed.
Patience and steady warmth are the two inputs that matter most at this stage.
Ideal Growing Conditions: Temperature, Humidity and Gas Exchange During Colonisation
Get the environment wrong and even healthy spawn will stall. Here is what actually matters during colonisation.
Temperature is the most controllable variable, and the one most often mismanaged. Warm-loving species such as oyster and king oyster colonise best at 22–28°C. Cool-tolerant species — shiitake and lion's mane — are happy at 18–24°C. Below 15°C, most species colonise extremely slowly, if at all. If you are colonising in an unheated room between October and March, the priority is a consistently warm spot — an airing cupboard, or a warm room — since inconsistent warmth does more harm than a stable temperature slightly below ideal.
Humidity during colonisation is widely misunderstood. You do not mist at this stage. What matters is the substrate's moisture content at preparation: field capacity — where it feels like a firmly wrung-out sponge — is roughly 60–65% moisture by weight. Get that right at mixing and ambient humidity during colonisation looks after itself.
Gas exchange causes a lot of confusion. Elevated CO₂ during colonisation is not a problem — mycelium actively prefers slightly raised carbon dioxide at this stage. What you want to avoid is over-ventilation, which dries the substrate and slows growth. Colonising bags and jars need some exchange through filter patches or loosened lids, but they should not sit in a draughty or heavily ventilated spot.
One thing you can ignore entirely: light. Mycelium colonises just as well in complete darkness. A cupboard, a box under the bed, a spare drawer — all perfectly good colonisation spots, provided the temperature is steady.
How to Tell When Mycelium Has Fully Colonised: A Visual Identification Guide
So how do you actually know when colonisation is finished?
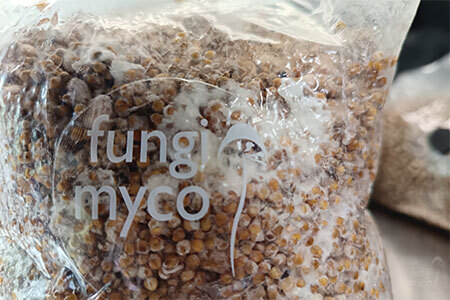
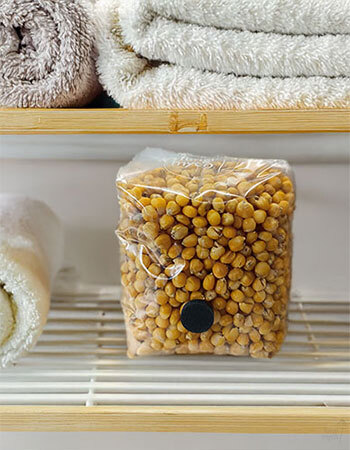
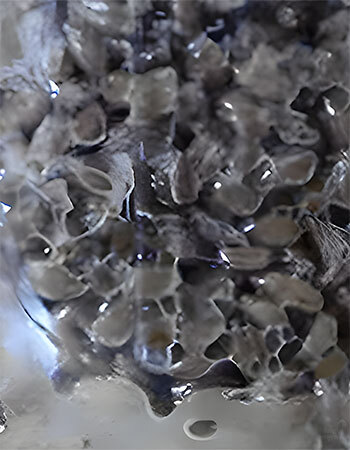
Full colonisation has a specific look. The substrate should be entirely covered in dense, bright white mycelium — no dark patches, no bare brown spots, no gaps. A fully colonised grain jar or bag resembles a solid white block. If you can still see substrate through the bag, it is not finished; give it time.
Growth pattern tells you something about vigour. Rhizomorphic growth — thick, cord-like strands that look almost like roots — points to a healthy, aggressive mycelium that tends to fruit well. Tomentose growth is fluffier and softer, more like cotton wool pressed against the substrate. Both are healthy; rhizomorphic is simply taken as a sign of stronger vigour [2].
Near completion, mycelium sometimes yellows slightly, particularly where strands consolidate. That is metabolic activity, not contamination — the mycelium shifting from growth toward reproductive readiness. You may also see metabolic water: small golden droplets on the surface. Also normal, and nothing to worry about.
Smell is an underused diagnostic. Healthy, fully colonised substrate smells earthy and pleasantly fungal. Sour smells suggest bacterial contamination; a sharp, ammonia-like note can mean a nitrogen imbalance or bacterial blotch; anything sweet or fruity is worth a close look.
A simple squeeze test helps too. Fully colonised substrate feels firm and cohesive — it holds together as a block when you press the outside of the bag. Loose, granular movement inside means it is not done.
The first time I saw pins forming before a bag had fully colonised, I rushed it into fruiting — and the yield suffered for it. Now I wait for full colonisation every time.
This surprises a lot of beginners: pins forming before colonisation is complete. If small primordia appear inside the bag, reduce light exposure and hold the temperature steady, and wait for full colonisation before starting fruiting conditions. If you are growing for the first time and want a full walkthrough, our beginner's guide to growing mushrooms covers the complete process.
Sterile Technique, Substrate Preparation, and Troubleshooting Colonisation Problems
Contamination rarely announces itself. It slips in during inoculation, and by the time it is visible the damage is usually done. Knowing where it enters, and how to read a stalled grow, gives you the best chance of consistent results.
Colour is your fastest diagnostic once contamination shows. Green or blue-green patches almost always mean Trichoderma, the most common contaminant in mushroom cultivation. Black growth usually indicates Aspergillus. Pink or orange-red streaks suggest Neurospora, a fast-spreading mould that will cross-contaminate other bags if it is not isolated quickly. Yellow or slimy patches point to bacterial blotch, with a distinctly foul, wet smell.
Damp homes carry a higher ambient mould-spore count, which makes sterile technique during inoculation all the more important. Contamination enters through inadequate sterilisation, poor technique, or damaged filter patches. Good grain spawn from a reputable supplier lowers the risk at source. A simple prevention checklist: work in a still air box or under a laminar flow hood; spray surfaces and gloves with 70% isopropyl alcohol; and keep windows shut and the air still.
When colonisation stalls without obvious contamination, the cause is almost always a temperature that is too low, a substrate that is too wet, or weak spawn. Cold rooms in winter are the single most common reason a colonisation fails, and a consistently warm spot fixes it. If water drips freely when you squeeze the substrate, it was too wet at mixing. And shaking a partially colonised grain bag at 30–50% colonisation can speed things up by moving active mycelium onto fresh grain. For a colour-by-colour reference, our mushroom contamination identification guide goes through each one in turn.
Frequently Asked Questions
It depends mainly on the species and the temperature. Oyster mushrooms are among the faster species at 14–21 days, while shiitake and lion's mane can take 14–35 days, and king stropharia longer still. Cooler room temperatures in winter will extend these timelines.
Fully colonised substrate is covered in dense, bright white mycelium with no remaining dark or bare patches. It feels firm and consolidated when squeezed, and a healthy earthy smell is normal. Any green, black or pink colouring indicates contamination rather than complete colonisation.
Most cultivated species colonise best between 18 and 28°C. Oyster mushrooms prefer 21–27°C, while shiitake and lion's mane perform well at 20–25°C. In autumn and winter, colonise in a consistently warm spot such as an airing cupboard to hold a steady temperature in a cooler home.
The most common causes are temperatures below 18°C, over-wet substrate, weak or dead spawn, or early contamination. Cold rooms in winter are a frequent culprit. Check your substrate moisture — it should feel like a wrung-out sponge — and make sure the growing space stays consistently warm.
Colonisation is complete when white mycelium covers all of the substrate with no visible bare patches. The substrate should feel firm and cohesive and smell earthy. At that point you can initiate fruiting by introducing fresh air, indirect light, and raising humidity.
1: Johnston, E & Brewer, G. Mycelium: Exploring the hidden dimension of fungi. Available at: (Accessed 25 April 2026).
2: Wikipedia - Mycelium. Available at: https://en.wikipedia.org/wiki/Mycelium (Accessed 26 April 2026).